Monday, November 9, 2009

Image Viewing Problem

Yikes! Bandwidth Exceeded!

You may have noticed some of my images aren't showing up these days. I just wanted to let everyone know that this is a temporary problem. Should be back to normal around the 18th of this month. I was using Photobucket.com to host my images, and it seems they only allow a limited amount of traffic every month for non pro accounts. If this happens again, I will move the images to a new host. Or, I may have to consider taking up donations to open a pro account in the future.

Sorry for the inconvenience.

Mieljolie

Saturday, October 17, 2009

HP Unity Scarf Finally Finished

Well, almost one year later, I finally found time to finish the Harry Potter Unity Scarf I started loom knitting for my mom on my pick-up stick loom. I would have had it finished much earlier, but I've been busy with the tabistry projects among other things.

Unity Scarf

I'm really please with how it turned out. Though, I had to simplify the pattern way more than I would have like to by eliminating all the crests but the first one. Oh well. It's very soft, thick and heavy. Should keep her neck toasty warm on cold nights. The black yarn I used is Caron Simply Soft, which I believe is made from recycled plastic bottles. To me, that is just mind boggling. How can a yarn this soft and pretty be made from bottles? The color stripes are various acrylic worsted weight yarns that I happened to have around. Though, as usual, my camera is oversaturating the colors. They are far more muted than they appear here.

unity scarf

If you want to see some of the progress pics I posted while I was working on it, go to:

http://knitty-witty.blogspot.com/2008/12/harry-potter-unity-scarf-on-flexible.html

Thanks for looking!

Wednesday, September 30, 2009

Another Thrift Store Score!!

Just had to share this cool gadget! I just bought a "Speedy Wool Winder" (yarn ball winder) like new in it's original box at our local thrift store for $1! My daughter and I are having a lot of fun winding up balls. It really is a handy item and so far great entertainment as well. With all the yarn I've been picking up everywhere, this ought to be put to good use.


I also scored a large jar of 1" wooden tassel beads! There are a LOT of bead in that jar!! I have no idea what I'm going to use this many for! Any suggestions would be great! Or, if any of you need some, I'm happy to swap. It was a great buy, and I needed some tassels for my belly dance belts. :) I want to hang them like tribal dancers wear from my belt.


My orignal mission was to pick up a Christmas tree stand to make one of those duct tape "body double" dress forms from a tutorial I found. I found one in great condition that ought to work perfectly. If I have any success, I'll be posting that and the tassels on my general craft blog.

Tuesday, August 11, 2009

Pygmy Puff Version 2 on DIY Loom

So, the daughter saw Arnold, the pygmy puff from the new release "Harry Potter and the Half-Blood Prince" and wanted hers to have a face like it. However, instead of performing cosmetic surgery to give Nibbles a face lift, we finally agreed to make a new one out of some fun fur I found on clearance. We plan to enter our new version in the Leaky Cauldrons August HBP Contest.

arnold the pygmy puff

We used our DIY loom with just 18 pegs. She loomed about half of before getting bored and handing it off to me. I must say I was impressed that she stayed with it so long. Fun fur is not a pleasant yarn to work with. This one is slightly different from the old one in that the elastic hole is now on his bum to make him a finger puppet or pencil topper. Since he is less than half the size of the old one, we also used a smaller clippy to attach him to her shoulder.

arnold the pygmy puff

The eyes are black glass beads baked into a face that is skin-toned poly clay dusted with blue and purple eyeshadow. We added a tuft of various colors of acrylic yarn at his forehead.

arnold the pygmy puff

arnold the pygmy puff

Thursday, April 2, 2009

I'm Still Alive & Looming

Phew, it's been too long since I've posted about my knitting endeavors! Still trying to find the time to finish the Unity Scarf. Just one color band left and the crest. Will it ever get there?! I just haven't been able to pick it back up these days. Family, faires, and other crafting have kept me busy.

I really hope to start some gloves to try out the new techniques I've experimented with. I'm in love with the "slither" arm warmers Crafterella needle-knit me in a swap for my "tabistry" Turkish Vest pattern. They fit so perfectly and are sooo cool. I'm so smitten by them, I would like to try to translate a similar pattern to loom in the near future. We shall see.


Aren't they the neatest?!

Lately, I've been accumulating quite the yarn collection. I find them mostly at local swap meets and in clearance bins. About 4 milk crates full so far! Mostly acrylics, but I have managed to find a couple wool skeins I plan to try Kool-aid dying. Sounds like something fun to do this summer.

That's about all the news for now. As usual, I will keep posting my finished projects and new breakthroughs.

Monday, February 9, 2009

Lacey Cast On & Bind Off

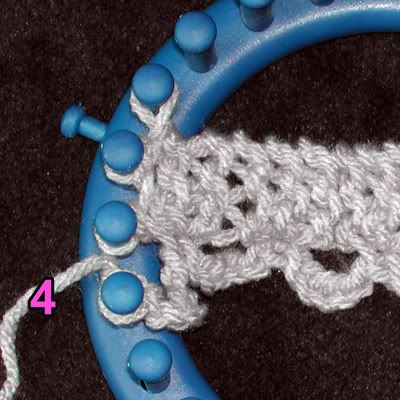
After experimenting with the lace trim, someone in the KKLoom group had asked how it might be attached to a hat. That got me thinking. Well, I figured out how to run almost the same pattern horizontally on the loom so you wouldn't need to attach it separately.

Cast on (bottom edge)
Photobucket

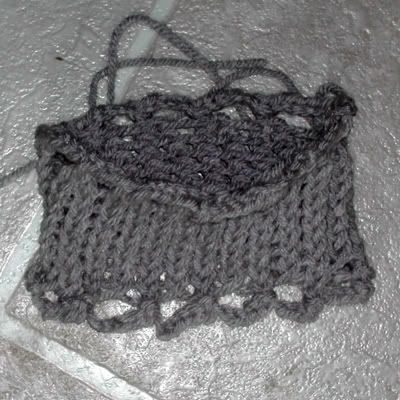
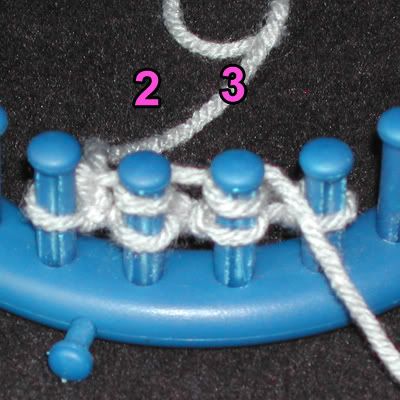
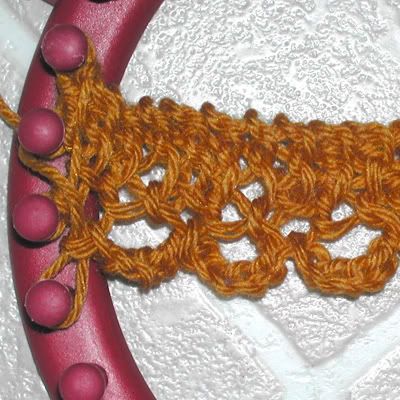
Bind off ( bottom edge)
Photobucket

I then realized this what was being referred to as "picot cast on" & "i-cord bind off" here. It looks very complicated and difficlut, but is really very simple to create.

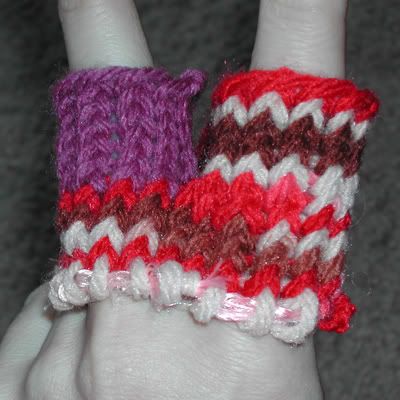
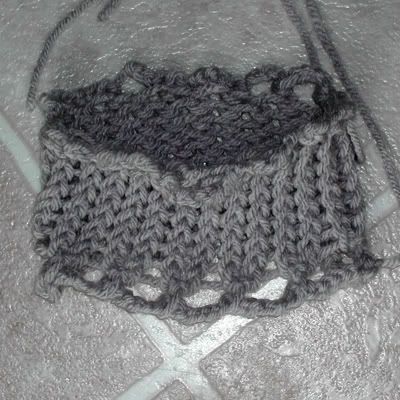
After making the above sample, I tried someone else's instructions that are what I think is the original "picot" cast on.

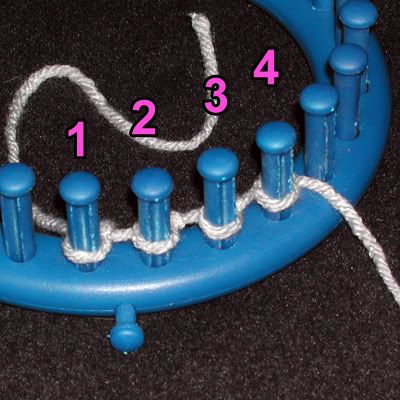
"...ewrapped pegs 1 and 2 and knitted off ... did this 6 times.Then I moved over to pegs 2 and 3 and did the same. Then pegs 3 and 4 .....until I reached the end..."

It ends up a thicker, fluffier scallop edge. This is what I deciphered from it:

******** Beginning Cast on ***************

Put a slip knot on #1.
Wrap yarn in front of #2, around the back of #2, between the two pegs, in front of #1, around to the back of #1 and between the pegs and back in front of #2.
Knit off both.

******** Knit off i-cord **********

Continue to wrap behind #2, in front of #1, behind #1, between, and in front of #2.
Knit off both.
Repeat this figure eight wrapping/knitting 5-7 more times.
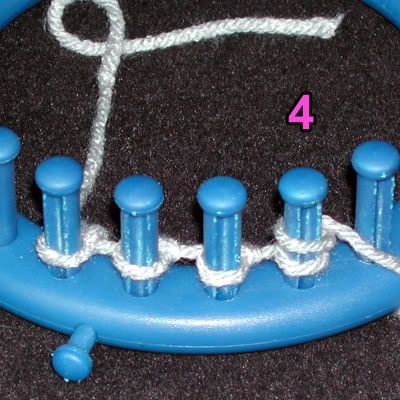
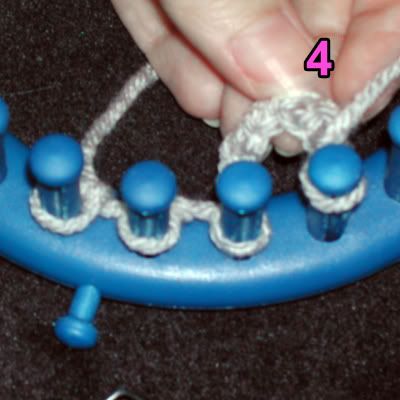
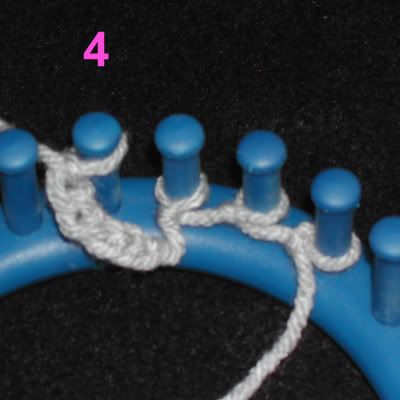
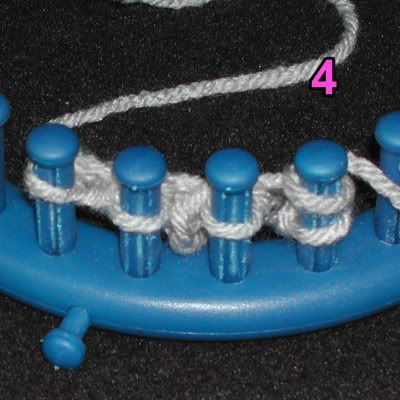
******** Cast on New Peg **********

Wrap yarn in front of #3, around the back of #3, between the two pegs, in front of #2, around to the back of #2 and between the pegs and back in front of #3.
Knit off both.

******** End of Pattern ************

Repeat steps from "Knit off i-cord" on through "Cast on New Peg". Then, move on to next peg on and on until you get back to the first.

NOTE: You'll notice that the first i-cord just hangs. Find the original slip knotted stitch you started with (it will be the last stitch loop at the end of the chain) hanging off the end. Place the stitch on the empty peg beside the #1 peg that hasn't been caston, yet. When you work your way around the loom and get all the pegs cast on with the chains, knit the slip knotted stitch into first stitch of the last chain. All pegs should be cast on now. Then, just start knitting as normal. She recommended putting rows of purls or garter stitch in to stop it from curling.

Knitted Lace Edging Tutorial

I was playing with the trim mentioned previously in my posts.

This is the trim:
Photobucket

Here is a quick how to:

First, cast on 4 pegs:
Photobucket

Knit off the 4th peg about 6 times
Photobucket

It should look something like this after the 6th knit stitch:
Photobucket

Here is the back for a better look:
Photobucket

Now, bring the yarn in front of 3rd peg and purl to the left pegs 3,2,1
Photobucket

Knit right pegs 2 & 3
Photobucket

Repeat the purls left 321 & the knits right 2 & 3 about 3 times

Return to 4th peg and repeat knit offs.
Photobucket

It should look like this after the knit offs:
Photobucket

Continue this pattern until desired length.

The original post is here.

Friday, February 6, 2009

Knitted Lace Edging (with pattern)

I was reading through one of the Knifty Knitter Loom groups' messages where someone had asked about recreating a needle-knitted trim, labeled Garter Stitch Loops, on the Lion Brand's website.


It sounded interesting, so I gave the pattern a try on my KK loom. First off, I'm very new to loom knitting. In fact, I'm new to knitting in general. So, it was difficult to translate what was going on in the knitting. But, I managed to recreate it very similar, though not exact. You also have to keep in mind that this is a large gauge loom and I'm using one strand of worsted yarn. On my pick-up stick loom, this knit would be much tighter.

My first attempt using bind offs to make the loops:
edging
The loops are a bit lop-sided. :)

My second attempt just knitting the same peg off several times to create the loops:
edging 2
Much more balanced. I think it would make a lovely edge to a scarf.

I'm glad I gave it a try. I'd never made a trim before. I think it will come in handy for future projects.

Here is the instructions:

cast on 4 pegs,

******start pattern**************************

while on peg #4, knit stitch only #4 peg 6-7 times,
* purl peg #3 back left to the #1,
knit to the right to peg #3,
repeat from * 1-2 times stopping on peg #3,

****** repeat the pattern after caston*****

bind off

That should give you what I have in the second pic.

Monday, January 26, 2009

Knitting Gloves

Inspiration struck this morning when I awoke. I thought of a way to knit gloves from the fingertips down on my adjustable loom without having to remove the stitches from the loom.
Photobucket

Let me explain. Here is the loom open as normal.
Photobucket

I closed off the pegs where the finger holes would be using a small rubberband with a spacer bead on it for each side of the fingers.
Photobucket

I knitted the fingers with separate yarn until the finger was the desired length. Slipped the stitches off of the inside pegs and placed them on the pegs on each side of them. Then, I removed the rubberbands I used to close the loom and replace the stiches Finally, I just knit around the entire loom like normal.

Please forgive the two different colored yarns, only two fingers and the fact I didn't tie anything off. The only real problem I'm facing is the hole between the fingers. I've been informed that this is nornal for knitted gloves, but I could probably close the hole by sewing it shut with the tail from each finger.
Photobucket
Photobucket

To make the rest of the glove would be indentical to the above. The thumb could also possibly be done the same way by leaving space on the loom for it and starting it further down.

If anyone has any suggestions to fix the holes between the fingers, I'm all ears.

Monday, January 5, 2009

Advantages of the Flexible Loom

Over Standard Looms and Boards:

  • Compact - it is more portable than the knifty knitters or other wooden knitting boards and looms. Mine can be rolled up with a project on it without destroying it. Yet, when working on small projects, it will still sit upright on my lap or a table.
  • Inexpensive - it's really cheap to make and doesn't take too much time or effort to assemble. No woodworking skill required or special parts to order.
  • Resizable - It's customizable for each size project with minimal effort. And, can be broke up into two looms for projects in pairs like socks.
  • Adjustable Gauge - I can change the gauge by changing the peg size or simply by adding a couple spacers between the pegs. No more large/extra large gauge only Knifty Knitter projects for me!
  • Increase/Decrease on the fly - I can increase/decrease at any peg on the loom. Try that on a Knifty Knitter! Even the knitting boards can only increase/decrease on the ends unless you move each loop down the loom each time. May not mean much for most projects, but it definitely makes it more versitile. Should be great for cables and such.
  • Double-knit - You can change the shape of the loom with a project attached to it, which is pretty cool. You could switch from knitting in-the-round to double-knit and back in a single project.
  • Gussets - Now gloves and other items requiring gussets are faster and easier. You can knit them continuously all on the same loom.
  • Also great for making i-cord, small projects like spool-knit, or even use it as a peg loom for rugs.


hat and loom

More Pick-Up Stick Loom Experiments

Here is an earlier attempt at "pick-up stick" loom showing what it looks like in the middle of some decreasing:
Photobucket

Here is the results.

Photobucket

Photobucket

I made a cone hat for my daughters doll. It was mostly an experiment in decreasing on the loom. I removed 1 peg at several points equally all around the loom after every 9 rows. It is pretty small and I used black yarn, so it's really hard to see the decreases.

Once I started building it with 2 sticks together, I tried a sample starting in 1 over 2 and switching to regular 1 over 1 on the top. I eventually made an adult size of this pattern, but failed to take a pic before it dissappeared.

Photobucket

Blog Widget by LinkWithin