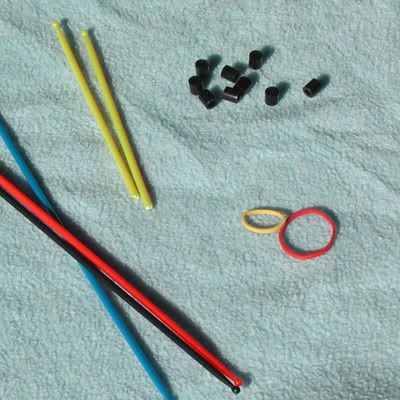
- Pegs Any of the following will work:
- Pick-up Sticks (fine - small gauge)
- Swizzel/cocktail stirring sticks (medium - large)
- Pencils or Ball-point Pen barrels (large - extra large)
- Small Rubberbands
- Spacers - optional.
- Knitting Tool - optional.
- Wooden dowels or pen barrels - optional for Double-Knit.
Here is what I used for my current loom:

*******************************************
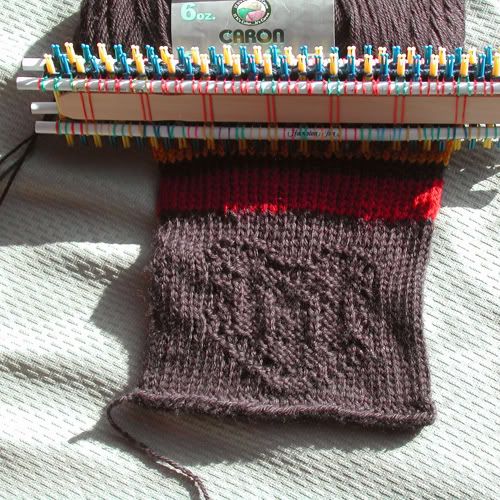
Here is my current loom being used as a knitting board to knit a scarf in a mix of e-wrap and double-knit.

To read/see more of it's progress, click here.
I've been experimenting with different materials to make a finer gauge knitting loom for socks. And, I've come up with a decent idea. I tried bamboo BBQ skewers, but they splinter and are pointy at the end. So, I found some of those cheap plastic "pick-up sticks" from the old game with the knobbed ends at an online party supply store. My daughter needed trinkets for her holiday party, so we bought a huge lot of them.
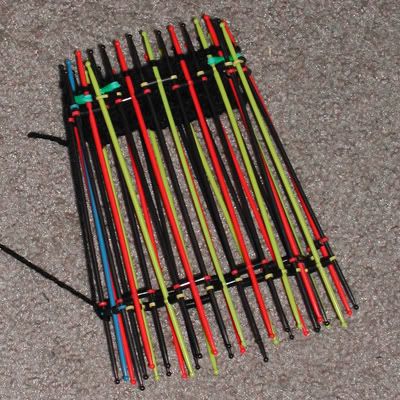
I used small hair rubberbands (real rubber, NOT the new plastic kind that break) and plastic beads with large enough holes for the rubberband to go through. The beads aren't necessary. Twisting the rubberbands inbetween the sticks will produce smaller spacing. I joined one row of rubberband near the top and one near the bottom to keep the loom stable. This is all that is required for knitting in-the-round or flat panel.
To double-knit, I added ball point pen barrels taped together to stiffen the sides and two rubberbands to each end of the loom with spacers to change the distance between the two rake sides. Since the scarf is fairly wide, I also added some paint sticks I had to help stiffen the center even more to prevent it from bowing under stress. NOTE: This loom should not be wrapped too tightly, or bowing will increase.
Earlier attempt at "pick-up stick" loom showing decreasing:
Read/See more about this loom experiment, click here.
Click here to see my other attempts at creating this loom.
******************************************************
The last thing I really need to experiment with is how wide I can make the loom before it starts falling apart. So far, when the rubberbands are tight, it holds together really well for hat/scarf sized projects. The largest I have attempted so far is an 8" scarf with 64 pegs, which makes the loom about 13" long.


I would like to know more about he starter kit with the extra items that you have. Can you please email me at campbellwr@yahoo.com. I love this site, it is very informative.
ReplyDeleteThis is brilliant, so simple and yet so clever. I'm really looking forward to trying it myself!
ReplyDeleteThanks, maypanic. They work wonderfully. And, I look forward to seeing your loom and what you make with it, if you'll share. :)
ReplyDeleteMieljolie
Awesome! Thanks for the tutorial! I can't wait to try it.
ReplyDeleteAnon, you're very welcome. Hope it proves useful to you. I'd love to know how it works for you.
ReplyDeleteMieljolie
I'm a little frightened by the brilliance, but since I am a left-handed crocheter who doesn't knit, I am at sea about how it works...lovely idea though!
ReplyDeleteGreat tuto, thanks! :)
ReplyDeletemizdarlin, it's not as difficult as it may appear. If you can crochet, you can loom knit on this loom. I'm still working on finishing up some tutorials on how to use the loom, but it can basically be used just like any other rake, loom or board. Don't let the lack of rigidness scare you. Yarn bends and so should the loom. :)
ReplyDeleteLeelaBijou, you're very welcome! Hope this tutorial helps make many wonderful projects!
Mieljolie
Tiffany-can you let me know when these new tutes are ready? I'm anxious to learn a new technique! Thanks!
ReplyDeletemizdarlin, sure thing! I'll try to get some up very soon.
ReplyDeleteMieljolie
This is such a cool idea. I just btought a set of small round looms. I am loving the thought of using them! I have had my eye on a much bigger loom to do prayer shawls, and now I'm thinking I could create my own like this! And it will be much smaller to tote around! Thanks for the idea!
ReplyDeleteYour welcome, Momma Roar! I like that it is easier to travel with this type of loom, too. Need to do some more traveling so I will get more knitting projects finished. :D
ReplyDeleteMieljolie
bashing head on keyboard wondering why I didn't think of this! glad someone did though! thanks!
ReplyDeleteThanks, Anon! LOL! Don't hurt your head! This loom was thought up purely out of curiosity. :)
ReplyDeleteIt works great! Many people still don't believe me, but it really does. Have a great time with it!
Mieljolie
You so need to find a way to market these!!! They are so useful to the looming world!!
ReplyDeleteYou made my day!
ReplyDeleteI've been dreaming of a pegloom for ages! Now i can have a simple one!
Thank you!
Thank you for this, you innovative genius!!!
ReplyDelete